Sensor Drift vs. Bad Equipment: A Diagnostic Playbook for Ops and Maintenance
At Siege Engineering, we've seen a familiar story unfold in chemical plants and natural gas facilities across the Gulf Coast.
A line drifts off spec, operators say the flow isn't correct, and maintenance proceeds to rebuild the pump (sometimes twice), yet production still won't stabilize. Alarms keep chirping, and the same debate begins: Is it the equipment, or is the measurement lying?
More often than not, we find that this issue isn't mechanical, but rather a sensor causing the drifting or failing measurements that make healthy equipment appear guilty, all the while sending teams down a costly rabbit hole.
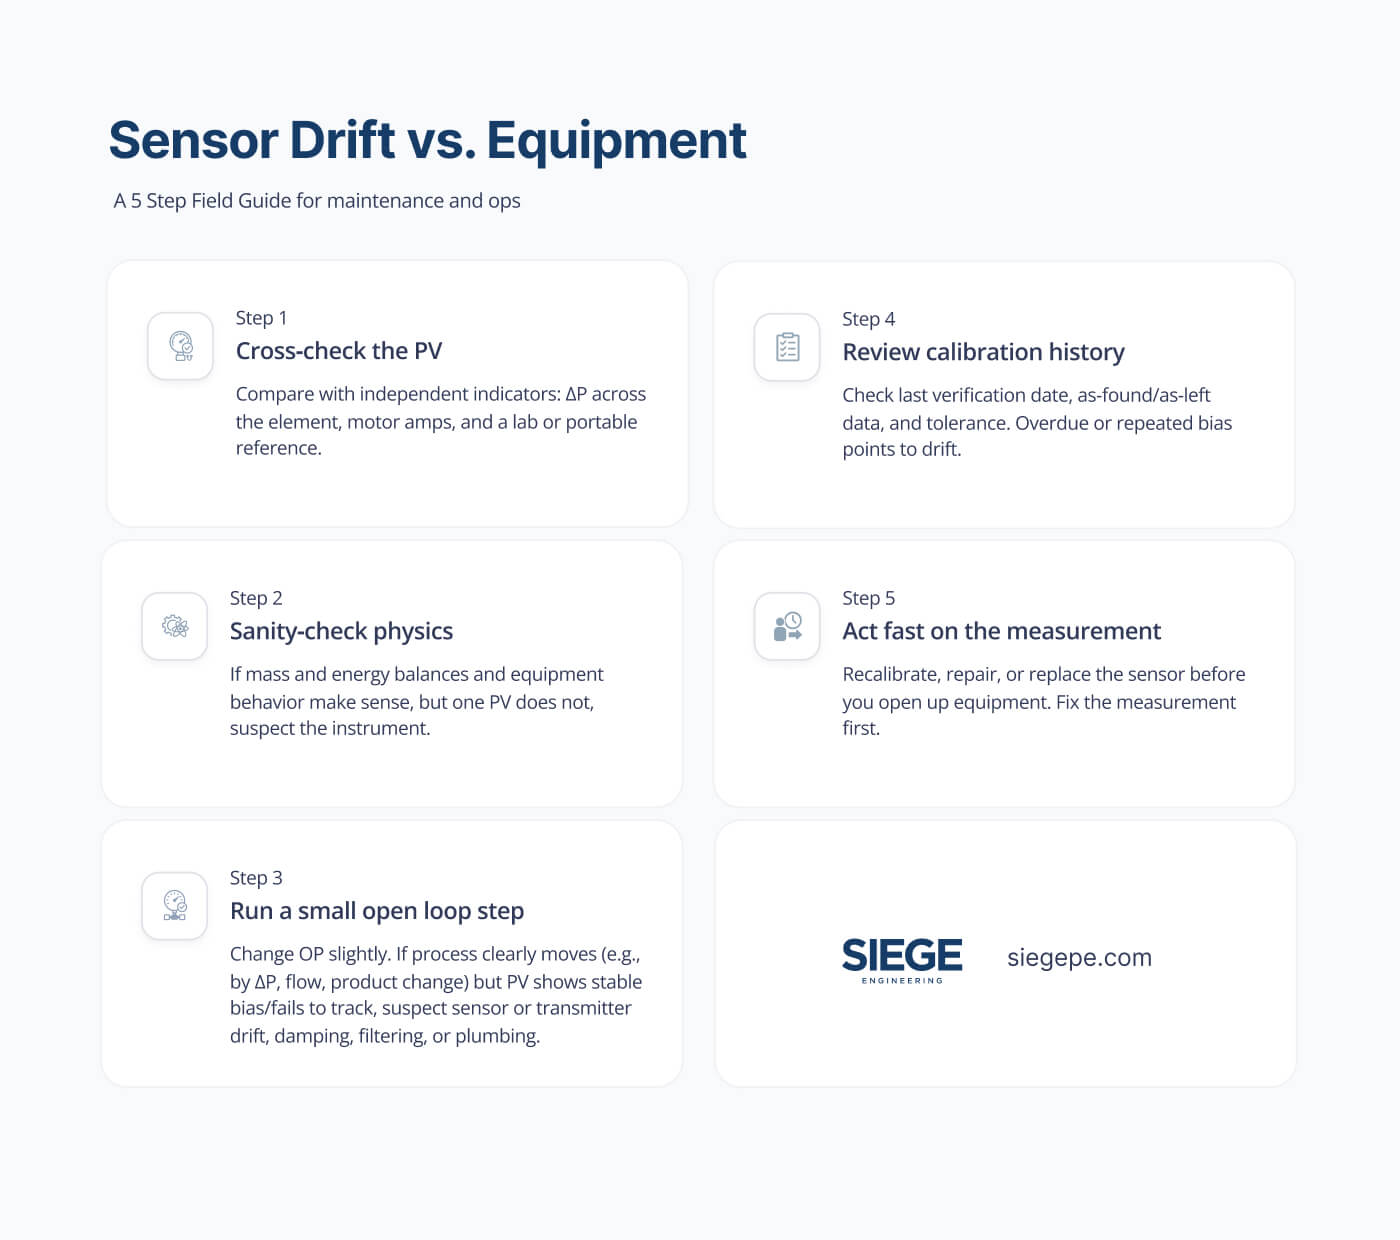
To help combat this issue, we've developed a diagnostic playbook explicitly designed for chemical manufacturing and natural gas processing to help avoid this costly illusion.
Drift vs. Failure: Know the Difference
Sensor drift is the gradual change in a measurement over time, as it's a subtle, creeping issue that often goes unnoticed until operators no longer trust the data. When this happens, Sudden sensor failure, by contrast, can be caused by electrical faults, impulse line plugging, or outright damage. But it's important to note that the distinction between the two matters with drift typically requiring recalibration and monitoring, while failure demands immediate repair or replacement.
Especially in natural gas processing, where pressures are high and streams are flammable, drift can pose a serious threat by masking safety-critical deviations that operators must see in real time, making it crucial to recognize before compromising safety or compliance.
The Cost of Getting It Wrong
Wasted work orders, unnecessary spare parts, and lost production hours are all common symptoms when misdiagnosing drift as a mechanical issue. In chemical manufacturing, the stakes are even higher, with unplanned downtime averaging at least $100,000–$125,000 per hour.
Furthermore, industry studies suggest significant misdiagnosis of instrumentation as equipment failure, backed by research that shows up to 63% of instrument-related maintenance calls find no problems with suspected equipment, when 75% of control valves pulled for maintenance don't actually need it. In these cases, substantial resources are wasted on unnecessary teardowns when the real issue lies in control systems or sensor drift.
On the other hand, we see the control valve market itself reflecting this growing need: Estimates for the 2023 control valve market range between USD 6.4 billion and USD 6.7 billion, with strong growth projected through the next decade, continuing to expand as diagnostic capabilities advance, underscoring the importance of treating instrumentation as a frontline reliability, not an afterthought.
Calibration: Your First Line of Defense
The most reliable defense against sensor drift is calibration, and with the right interval, depending on process criticality, environment, and regulations, simplified guidelines for facilities to help remediate the problem include:
- Pressure transmitters: In the absence of site history, a defensible starting point is 4–6 years indoors (stable conditions) and 1–4 years outdoors, with shorter intervals for harsh service or remote diaphragm seals. Additionally, high-performance devices can justify longer intervals, as some environmental guidance recommends annual recalibration for differential-pressure transmitters used in flow services.
- Temperature transmitters: While there isn't a universal 1–4/4–6-year rule, set intervals risk-based (criticality, environment, required accuracy). However, some models (e.g., Honeywell STT850) state they do not require periodic calibration to maintain accuracy. However, it's important to note that many sites still schedule annual time-based checks, and where safety integrity is involved, the standards require periodic proof testing at an interval defined by the SRS (often about a year in practice, but not universal).
- Flow Instruments: Under NPDES practice, EPA inspection guidance expects at least annual calibration/verification of flow-measurement systems, while many permits require yearly calibration. Some programs (e.g., EPA's GHG reporting) allow biennial recalibration for specific wastewater flow devices, so advanced meters may have longer intervals where the permit or applicable rule allows, even though NPDES permits commonly specify annual verification/calibration.
Analyzers: Set intervals based on manufacturer guidance and service severity, rather than a fixed rule.
- Gas chromatographs, custody-transfer setups are commonly configured for daily auto-cal/validation, while general process service may extend to longer, performance-based intervals.
- pH analyzer calibration frequency should start with monthly intervals for stable conditions, with intervals shortened for harsh environments or high-accuracy applications based on drift monitoring and process criticality.
- Gas detectors (portable/fixed) should get a bump/functional check before each day's use. If the check fails, a full calibration should be performed. Calibrate portables according to the schedule specified by the manufacturer for each sensor and application (as the interval can be shortened for harsh conditions). Fixed-point systems should follow IEC/EN guidance and the device manual. For example, MSA Ultima X requires checks at least every six months, as per EN 60079-29-2/EN 45544-4, while Teledyne iTrans2 recommends quarterly checks for catalytic/toxic points and annual checks for IR, with a mid-year functional test. Adjust intervals based on conditions and the plant safety plan.
- Oxygen analyzers should have set intervals by technology and service. Paramagnetic percent-O₂ analyzers commonly recommend ~3-month verification/calibration, adjustable for application, location, and required accuracy (e.g., Michell XTP601/XPM601). Trace-O₂ / zirconia (combustion or ppm) analyzers are typically specified in the 1–3-month range depending on service (e.g., Michell XZR250/XZR400 manuals). Where site QA requires, start with shorter intervals and extend based on stability and performance trending. Always follow the device manual for zero/span (or autocal) procedures; the Yokogawa MG8G and Fuji ZKM manuals detail the required setups, gases, and autocal cycle settings. For harsher conditions, dirty samples, high temperature, or vibration, apply a risk-based approach and tighten intervals as needed (manufacturers note that frequency depends on location/application/accuracy, and provide features like blowdown for dusty services).
- Moisture (dew-point) analyzers for aluminum-oxide/ceramic impedance sensors in process gases, plan annual recalibration, shortening to ~6 months in sour, contaminated, or mission-critical service (e.g., Promet EExd: 12 months for sweet gas, 6 months for sour; Promet I.S.: annual, reduced in harsher/critical service). For DRYCAP-type instruments (e.g., Vaisala DMT152), the recommended interval is 2 years, shortened to ~1 year when operated at the wet end of the range or if accuracy is in doubt. Set intervals based on site history and measurement criticality; verify against a calibrated reference, and use laboratory/NIST-traceable standards or manufacturer service for adjustments.
EPA's GHG reporting rule requires regular calibration and specified accuracies (often using manufacturer or consensus methods), while EPA emissions-monitoring programs using calibration gases require NIST-traceable gases under the EPA Traceability Protocol.
By using a risk-based approach, facilities calibrating more often for safety-critical or high-value measurements, and extending intervals for non-critical points with stable history, help avoid unnecessary work while maintaining accuracy.
It's essential to keep in mind that while skipping calibration may save a day, it raises the odds of downtime, safety issues, and non-compliance, while even a 0.25% flow error at large natural-gas volumes can translate into hundreds of thousands to millions of dollars per year.
Safety and Compliance
In natural gas operations, instrumentation is all about compliance and lives, not just performance, while regulatory standards require instrumentation reliability for environmental and safety assurance. When drift masks a runaway pressure, a leaking valve, or an oxygen ingress event, both operator safety and permit compliance are compromised, and it's why maintaining sensor accuracy is not only a regulatory mandate, but a moral responsibility.
The Siege Advantage
At Siege, we built this playbook because it's the reality we're called into solve by helping facilities cut through the noise, separate sensor drift from actual equipment problems, and stabilize the process quickly.
By offering on-demand access to senior-level process control expertise, plants don't have to wait months to hire a full-time engineer. We arrive ready with calibration strategies, control loop diagnostics, and tuning tools to restore trust in your instrumentation and confidence in your plant's reliability.
In chemical and natural gas processing, every hour of downtime incurs a six-figure price tag, and each inaccurate sensor reading poses a risk, both of which can be avoided.
For more details on this exact scenario, see our article The Root Cause Wasn't the Pump, where we explore how control system issues masqueraded as equipment failures.
Sensor Drift Troubleshooting: 5-Step Diagnostic Checklist for Operations Teams


